Proxy Pattern
Proxy 디자인 패턴의 필요성과 그 구조에 대해 알아봅니다.읽는데 5분 정도 걸려요.Proxy
다른 기능, 서버를 사용하기 전에 본인선에서 처리해버릴 때, 그 본인을 proxy 라고 한다.
즉, 중계기로서 대리로 처리하는 것을 의미한다.
Remote Proxy Pattern

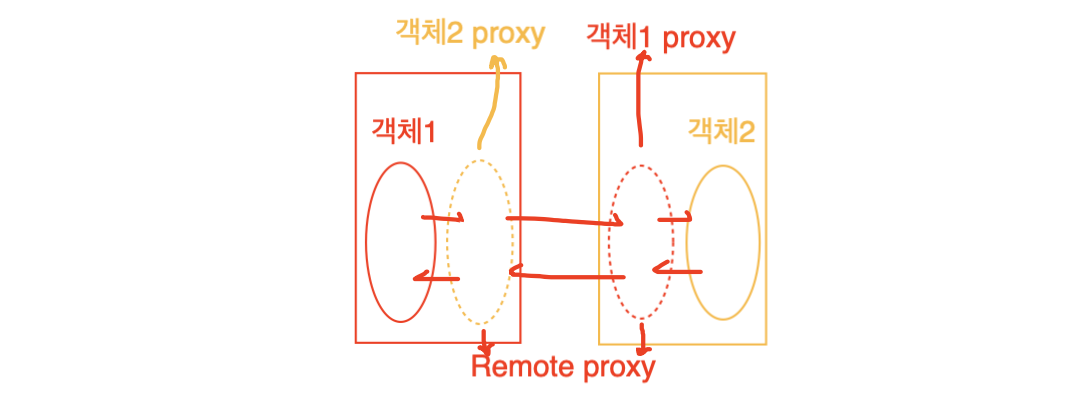
프로그램이 서로 다른 머신 혹은 프로세스에서 동작 중일 때, 한 프로그램에서 다른 프로그램의 메서드를 직접 사용하기 위해 서로 상대 프로그램의 proxy를 두어 통신한다.
이렇게 구성하면 각 프로그램은 다른 프로그램의 메서드를 직접 호출한다고 착각하게 되는데, 실제로 통신은 프록시 사이에서 일어나게 되는 것이다.
필요성
저번에 만들었던 GumballMachine의 상태를 원격으로 확인하는 서비스를 만들어보자.
api 통신하는 방법으로도 구현할 수 있겠지만, 이번엔 Java에서 지원하는 Remote 기능을 이용해서 구현해보자.
Java RMI
Java Remote Method Invocation은 분산되어 존재하는 객체 간의 메세지 전송을 가능케 하는 프로토콜로, CORBA의 Java 버전이라고 봐도 무방하다.
CORBA는 여러 언어로 구현된 분산 객체간 통신을 가능케 하기 위한 표준으로 이 기술도 함께 알아보면 좋을 듯 하다.
Remote
Remote는 Java에서 제공하는 인터페이스로 내부에 어떠한 메서드도 없다.
즉, Marker interface로서 JVM에게 이 클래스는 RMI 기능을 내포하고 있음을 알려주는 역할로 사용하게 된다.
public interface GumballMachineRemote extends Remote {
  public int getConut() throws RemoteException;
  public String getLocation() throws RemoteException;
  public State getState() throws RemoteException;
}
여기서 눈여겨 봐야 할 점은 Remote 메서드들이 모두 RemoteException 에러를 던질 수 있도록 해야한다는 점이다.
그 이유는, 네트워크가 끊기는 경우 프로그램이 정상동작 하지 않을 수 있기 때문이다.
Examples
그에 따라 상태 클래스도 약간의 변경이 필요하다.
- public interface State {
+ public interface State extends Serializable {
    public void insertQuarter();
    public void ejectQuarter();
    public void turnCrank();
    public void dispense();
}
Serializable 하는 이유는, 네트워크 통신을 할 때 객체를 직렬화해서 전송해야 하기 때문이다.
- public class GumballMachine {
+ public class GumballMachine extends UnicastRemoteObject implements GumballMachineRemote {
    ...

-   public GumballMachine(int gums) {
+   public GumballMachine(int gums, String location) throws RemoteException
      ...
    }

    public int getConut() {
      return count;
    }
    public String getLocation() {
      return location;
    }
    public State getState() {
      return state;
    }

    ...
  }
여기까지 코드를 수정하고 나면, 이제 원격에서 머신을 실행시키며 RMI 레지스트리에 등록을 해줘야 한다.
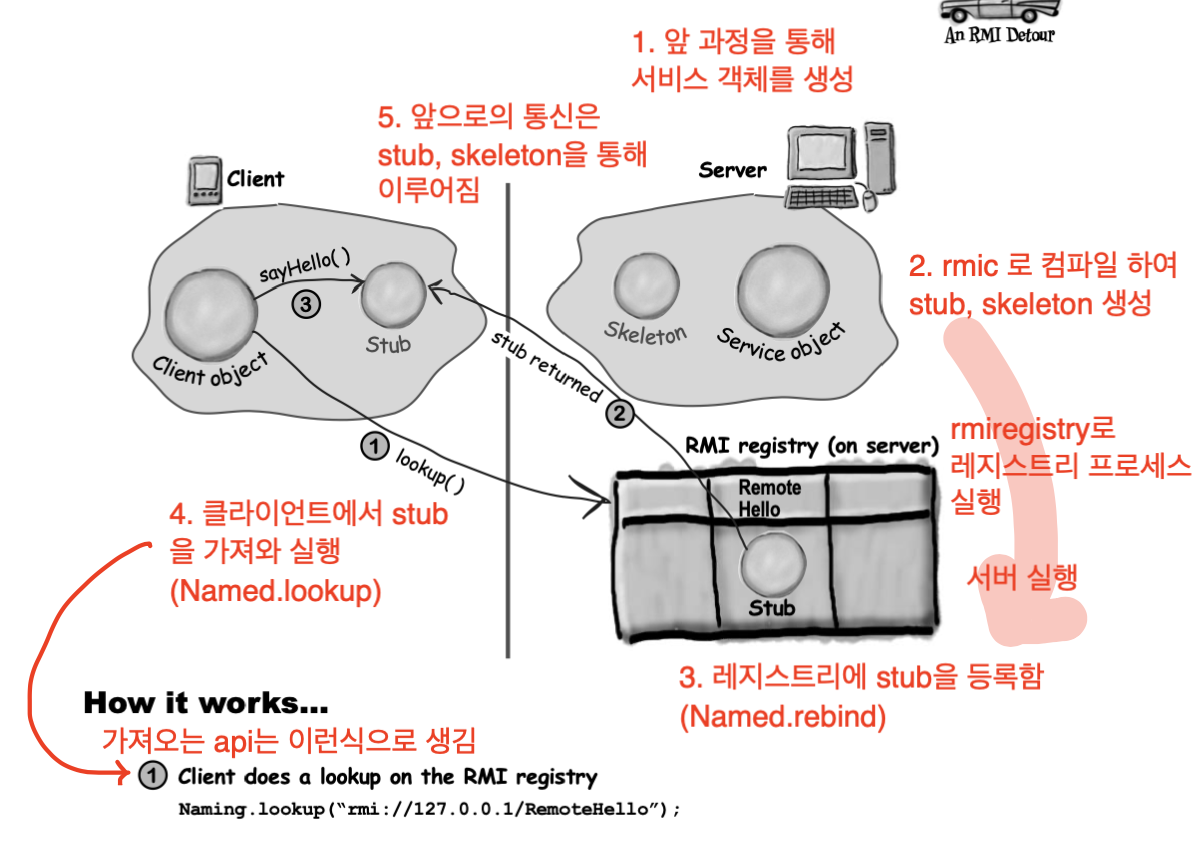
따라서 우선 RMI 레지스트리를 활성화 시켜준다.
$ rmiregistry
그다음 원격 머신을 실행시켜준다.
public class RemoteMain {
  public static void main(String args[]) {
    GumballMachineRemote gumballMachine = new GumballMachine(10, "my-location");
    Naming.rebind("//my-location/gumballMachine", gumballMachine);
  }
}
여기서 rebind 메서드를 통해 레지스트리에 stub을 등록시켜 주는 것이다.
하지만, stub을 생성 시켜주기위해 아래의 rmic (RMI Compliler) 명령어를 실행하여 만들고 난 뒤 해당 코드를 실행해야 한다.
$ rmic RemoteMain
$ java RemoteMain
이렇게 하면 원격 저장소에 GumballMachineRemote의 stub가 레지스트리에 등록이 되었다!
이제 클라이언트(모니터)에서 데이터를 받아보자.
public class GumballMonitor {
  GumballMachineRemote machine;

  public GumballMonitor(GumballMachineRemote machine) {
    this.machine = machine;
  }

  public void report() {
    machine.getLocation();
    machine.getConut();
    machine.getState();
    ...
  }
}
public class MonitorMain {
  public static void main(String args[]) {
    GumballMachineRemote machine = Naming.lookup("rmi://my-location/gumballMachine");
    GumballMonitor monitor = new GumballMonitor(machine);
    monitor.report();
  }
}
여기서 lookup 메서드를 통해 원격 레지스트리에 등록된 stub을 다운로드 받아 사용하는 것이다.
위 과정을 그림으로 표현하면 다음과 같으니 참고하자.
